Replacing a wheel hub (or hub assembly with bearing) is one of those suspension jobs that many DIYers consider—but also often second-guess. When should you tackle the job yourself, and when is it wiser to turn to a pro? In this article, we compare the advantages, drawbacks, and critical safety factors when deciding between DIY and professional hub replacement.
What Is a Hub Replacement?

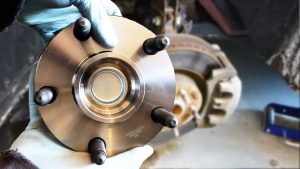
When we speak of a “hub replacement,” this usually means removing the wheel hub (often integrated with the wheel bearing) and installing a new hub assembly. In many modern vehicles, the hub and bearing are packaged together, making the job more modular. For older or classic vehicles, the hub and bearing may be separate, requiring pressing in and out of bearings.
Typical hub replacement steps include:
-
Lifting and supporting the vehicle
-
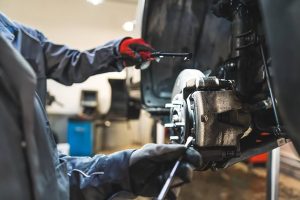
Removing the wheel, brake caliper, rotor
-
Removing the axle nut and disconnecting ABS sensors (if equipped)
-
Removing hub-to-knuckle bolts
-
Extracting the old hub (often with impact, heat, or puller)
-
Installing the new hub, torquing fasteners to spec
-
Reassembly and test
The process sounds straightforward — but as many DIY guides warn, corrosion, tight spaces, and alignment nuances can make things tricky.
Table: DIY vs Professional Hub Replacement — Key Comparison
| Factor | DIY (Self) | Professional (Shop) |
|---|---|---|
| Cost | Lower labor cost; pay only parts and tools | Higher due to labor and overhead |
| Control & Learning | You control every step and learn hands-on | Less hands-on experience, but results professionally assured |
| Tool Requirements | Must own or rent specialty tools (pullers, torque wrenches, press) | Shop has all proper tools and presses |
| Time & Effort | Often much longer; delays with stuck parts | Faster, more consistent turnaround |
| Quality Assurance | Depends on your skill, attention to detail, and cleanliness | Shop guarantees correct specs and tolerances |
| Risk of Mistakes | Higher if unfamiliar — torque errors, misalignment, contamination | Lower, as pros have experience and checks in place |
| Warranty / Guarantee | Often no warranty on labor | Most shops offer warranty on labor and parts |
Pros & Cons of DIY Hub Replacement
Pros
-
Cost savings on labor — you only pay for parts and any tool rental.
-
Learning and control — you know exactly how it’s done and can avoid shortcuts.
-
Flexible scheduling — you can work at your own pace.
-
Sense of accomplishment — mastering a complex automotive task is rewarding.
Cons
-
Tool investment — many jobs require expensive tools (pullers, presses, torque wrenches, specialty sockets).
-
Risk of damage — improper handling may damage ABS sensors, splines, seals, or bearing surfaces.
-
Time and frustration — stuck or corroded hubs, seized bolts, and tight spaces can eat hours.
-
No warranty — mistakes affect safety, and you bear the full responsibility.
-
Safety risk — incorrect torque or reassembly could lead to wheel detachment or failure while driving.
One DIYer commented: “It’s only 3 bolts holding the hub assembly in place … super easy just take your time.”
But others caution: “The frustration of trying to press in a bearing may not be worth it … low-cost jobs can escalate due to stuck parts.”
When to Choose Professional Replacement
Consider professional replacement when:
-
The hub or bearing is heavily corroded, seized, or rusted in place
-
You lack the correct tools or workshop facilities
-
You’re unsure about torque, clearances, or ABS integration
-
Vehicle safety or daily reliability is critical
-
You want warranty coverage on labor and parts
A professional shop has hydraulic presses, alignment checks, calibration tools, and experience to make the job smooth and reliable.
Step-by-Step Safety & Best Practices (DIY or Professional Oversight)
Here’s a checklist and guideline you (or the technician) should follow for safe, reliable hub replacement:
Preparation & Safety
-
Park on a level surface and use wheel chocks
-
Wear safety gear (glasses, gloves)
-
Disconnect battery (to avoid ABS sensor issues)
-
Consult factory manual for torque specs, sequence, and clearances
-
Use penetrating oil on bolts well ahead of removal
-
Label or mark orientation of parts (e.g., ABS sensor, wiring)
Disassembly (with care)
-
Loosen the axle nut and lug nuts before lifting
-
Raise vehicle, support with jack stands
-
Remove wheel, caliper, rotor
-
Disconnect ABS sensor wiring (if present)
-
Remove axle nut (use large breaker bar)
-
Tap or press out the hub shaft from splines carefully
-
Unbolt hub from knuckle (apply heat or use pullers if stuck)
-
Withdraw hub assembly gently, avoiding damaging seals or adjacent parts
Installation & Torquing
-
Clean mating surfaces and ensure flange faces are flush
-
Slide in new hub (check for orientation or ABS ring alignment)
-
Tighten hub-to-knuckle bolts in recommended torque sequence
-
Reinstall axle nut (preload or torque with proper method)
-
Reconnect ABS sensor and routing
-
Reinstall rotor, caliper, pads
-
Refit wheel, torque lug nuts after lowering
Verification & Test
-
Double-check all torques after initial road use
-
Spin wheel by hand; check for smooth rotation, no binding
-
Test drive gently, check for noise, vibration, ABS codes
-
Reinspect after a few hundred kilometers
Example Cost Breakdown
Here is a rough example of cost differences:
| Item | DIY Cost | Pro Shop Cost |
|---|---|---|
| Hub assembly + bearing | $80–$200 | $100–$300 (incl. quality parts) |
| Lubricants, grease, shop supplies | $10–$20 | included in shop fees |
| Tool rental or purchase | $30–$150+ | included in labor charge |
| Labor | $0 (you) | $200–$500 depending on difficulty |
| Total | $120–$400 | $300–$800+ |
According to a CarParts guide, professional hub replacement generally runs between $500 and $800 depending on labor and vehicle, while parts alone (for DIY) may cost $50–$200.
Table: Common Failure Modes & Risk Mitigation
| Failure Mode | Cause | Mitigation |
|---|---|---|
| Seized bolts | Corrosion, rust | Penetrating oil soak, heat |
| Bearing misfit | Wrong hub, misalignment | Use matching part codes, measure fit |
| Over-torque or under-torque | Mistaken spec usage | Use torque wrench and manufacturer specs |
| ABS sensor damage | Mishandling cables or positioning | Mark connectors, route wires cautiously |
| Seal damage | Insertion errors | Clean surfaces, avoid sharp edges |
| Wheel looseness | Improper torque, poor seating | Recheck torque after drive |
Safety Considerations: What You Can’t Afford to Overlook
-
Proper support: Never rely only on a jack — use sturdy jack stands
-
Torque precision: Incorrect torque is the leading cause of hub failure or wheel looseness
-
Clean environment: Dirt or debris entering bearings/seals will shorten life
-
ABS calibration: Some vehicles require sensor recalibration — failing that triggers ABS errors
-
Protect adjacent components: Brake lines, wheel speed sensors, CV joints must not be stressed
-
Use correct parts: Don’t substitute mismatched hubs — differences in flange face, bolt pattern, bearing preload matter
Decision Flow: Should You DIY or Hire?

Here’s a quick decision guide:
-
Do you have the correct tools (pullers, torque wrench, press or hub extractor)?
-
Is the hub easily accessible (low corrosion, no tight geometry)?
-
Is the vehicle low stakes (daily driver, not safety critical)?
-
Are you confident in torquing, alignment, and reassembly procedures?
-
Do you need warranty on labor or parts?
If you answered “no” to any of 1, 3, or 5, you may lean toward professional replacement for safer outcomes.
Final Thoughts & Where to Get Quality Parts
Hub replacement is an attainable DIY project for mechanically inclined and well-equipped enthusiasts, but it also carries significant risks if done improperly. Professional shops offer reliability, speed, and assurance at a higher cost.
Whether you choose DIY or professional service, always use quality components that match your vehicle’s specifications. For that, you can Buy Wheel Hub & Bearings online
from manufacturers who offer correct match parts and trusted brands.
In the end, your decision should balance cost, time, risk, and safety. A well-executed job — whether by you or a shop — keeps your wheels secure, bearings lasting, and vehicle handling sharp for many thousands of kilometers to come.